The demand for skilled MySQL DBAs continues to grow rapidly as companies rely more than ever on stable, scalable, and high-performing database environments. Whether you’re beginning your DBA journey or looking to strengthen your existing skills, having solid hands-on knowledge of MySQL is essential.
To help professionals accelerate their growth, I’m launching a comprehensive 70+ hour MySQL DBA Training Program, starting December 10, 2025.
This course is designed to take you from the fundamentals to advanced real-world DBA expertise — with a strong focus on practical understanding, troubleshooting, and hands-on demonstrations.
Introduction
— Course Agenda & Requirements — MySQL — Open source — Flavours
In this blog, I am going to explain the complete process involved in the MySQL group replication setup using SSL. The blog covers the complete MySQL config files as well as steps. I used the following aspects for my testing purpose.
MySQL 9.3.0 Innovation release
Ubuntu 24.10
3 physical servers
I also enabled the hostname based authentications between the three VMs. So that, I don’t need to provide the IPs explicitly each time. To achieve this, I used to update the the file “/etc/hosts” with following entries.
root@gr1:~# cat /etc/hosts | grep gr
198.19.249.194 gr1 gr1
198.19.249.116 gr2 gr2
198.19.249.163 gr3 gr3

---- Test
root@gr1:~# telnet gr2 3306
Trying 198.19.249.116...
Connected to gr2.
---- Works!
Creating SSL certificates:
As I am going to setting up the SSL based group replication, I need to create the required certificates first, before enabling the configurations. We usually have the certificates available inside the MySQL data directory, we can use it. At anycase, if you do not see the ssl certs use the following approach to create certificates manually.
mkdir -p /var/lib/ssl   #Use any directory
cd /var/lib/ssl
Execute the following commands inside “/var/lib/ssl/”
root@gr1:/var/lib/ssl# ls -lrth
total 20K
-rw-r--r-- 1 mysql mysql 1.7K May 5 01:16 ca-key.pem
-rw-r--r-- 1 mysql mysql 1.3K May 5 01:16 ca.pem
-rw-r--r-- 1 mysql mysql 956 May 5 01:16 server-req.pem
-rw------- 1 mysql mysql 1.7K May 5 01:17 server-key.pem
-rw-r--r-- 1 mysql mysql 1.2K May 5 01:17 server-cert.pem
root@gr1:/var/lib/ssl# openssl verify -CAfile ca.pem server-cert.pem
server-cert.pem: OK
GR and SSL configurations for “my.cnf” :
To setup the group replication, binary logs and gtid mode are mandatory configurations. Server id should be unique. Additionally, to enable the SSL based group replication, we need to enable the parameter “group_replication_ssl_mode=REQUIRED”. You can refer the complete set of configuration below.
The above configs are taken from “gr1” node. You can use the same config for the other nodes as well. But, make sure to change the server_id value as well as “group_replication_local_address”. Apart from that all the other settings can be used.
Also, make sure you did the MySQL restart after applying the config.
Note: For group replication, no need to keep the same SSL certificates between the server. GR can authenticate and works with the different certificates. But, this is not the case for Galera cluster. We need to keep the same certs on all nodes.
Creating the user with REQUIRE SSL privilege:
For the SSL based setup, the user should be created with “REQUIRE SSL” privilege and the certain other privileges are needed. Please check the following commands for the reference. It is recommended to disable the binary logs before creating the user.
SET sql_log_bin=0;
CREATE USER 'grepl'@'%' IDENTIFIED BY 'GRepl@321' REQUIRE SSL;
GRANT REPLICATION SLAVE,CONNECTION_ADMIN,BACKUP_ADMIN,GROUP_REPLICATION_STREAM ON . TO 'grepl'@'%';
FLUSH PRIVILEGES;
SET sql_log_bin=1;
Make sure the above statements should be executed on all the three nodes individually.
Bootstrapping the cluster:
Now, we are done with most of the steps, next step is need to start the group replication. I am using the single primary setup ( group_replication_single_primary_mode=ON ). So, I can bootstrap anyone of the node then, I can add the other two nodes as a secondary.
Bootstrapping “gr1” as a primary,
commands:
set global group_replication_bootstrap_group=on;
start group_replication user='grepl',password='GRepl@321';
set global group_replication_bootstrap_group=off;
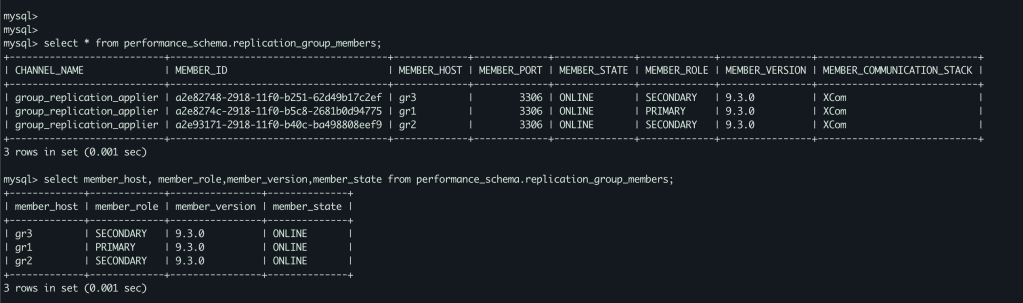
SELECT * FROM performance_schema.replication_group_members;
On “gr2” and “gr3”,
start group replication;
Final status,
As you see the above screenshot, all the nodes are joined and part of the GR cluster. We have one primary component ( gr1 ) other twos (gr2,gr3) are secondary.
Conclusion:
I hope you enjoyed this write up. Please share your thoughts in comment section or reach me directly on my LinkedIN or Gmail. I have the plan to create more topics in Group replication, please suggest your ideas. Looking forward to hear from you.
In this blog, I am going to share the MySQL 8 InnoDB architecture diagram with related variables . From the MySQL official document I have seen some InnoDB variables related to MySQL 8.0.20 . The architecture has been prepared based on that . Also, I am providing the variables list which used in this diagram and its respective versions .
MySQL 8 InnoDB Architecture :
For understand the diagram better , I have added some old variables as well ( sync_binlog / innodb_log_buffer / innodb_flush_log_at_trx_commit / innodb_flush_method etc .. )
I have marked the MySQL 8 variables with yellow colour .
Few months back, I have released the MySQL 8 architecture diagram . But, the image quality is very low . So, some peoples personally asked me to send the original image through email . But, unfortunately I don’t have that. So, I had the plan long time to draw the diagram again and release it in my website. It Happens now 🙂 . Also, the current diagram have some modifications as well . Thanks to everyone , who encouraging me to draw this diagram again . I will be come up with my next blog as much as possible .
Thanks !!!
Promotion:
If you are looking any MySQL related training or support, you can reach me on following details.
MySQL has the inbuilt query rewritten plugin for rewrite the SQL statements which received by the server before execute them .
Before MySQL 8.0.12 , the query rewritten plugin only supports for SELECT’s
From MySQL 8.0.12 , the query rewritten plugin will supports for INSERT , REPLACE, UPDATE, DELETE , SELECT .
One of our customer had the performance issue with the DELETE statements for particular table . The issue was happened after the new code deployment . In this blog, I am going to explain the implementation of the MySQL query rewrite plugin and how we overcome the issue using the MySQL query rewritten plugin .
MySQL Query rewritten plugin Implementation :
MySQL provides two SQL files for the installation / Uninstallation purpose . The files will be located under the directory “lc_messages_dir”
The file install_rewriter.sql for the installation purpose .
The file uninstall_rewriter.sql for the uninstallation purpose .
Once you loaded the file “install_rewriter.sql” , it will create a separate database / table / procedure for the query rewritten rules management .
database : query_rewrite
table : rewrite_rules
procedure : flush_rewrite_rules
Table structure :
The SQL rewritten rules needs to be configured on the table “rewrite_rules” .
Based on the query rules the server will rewrite the query .
All the columns have their own purpose .
Example :
Here is the simple example with query rewritten plugin .
pattern : SELECT ?
replacement : SELECT ? + 1
Hope this make sense !!
Note : It is always need to call the procedure “flush_rewrite_rules” . whenever you modified the rules table .
My problem statement with DELETE :
Last Friday One of our client had the new code deployment .
With the new code they mistakenly mentioned the UPPER function on one of the DELETE statement , actually which is not required .
So, the query was not able to use the INDEX as the function prevents the INDEX usage .
The table had around 30M records
Unfortunately modifying the code without UPPER case is not possible that time .
Fix : We have provided the fix by using the MySQL query rewritten plugin by adding the rules without the UPPER function .
It is restricted to share the production data , so I have reproduced the same issue at my local environment with less data .
Experiment at my local :
Created the table “jc_rewritten” and inserted some records .
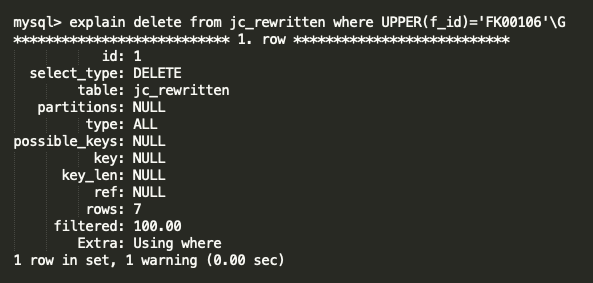
DELETE with UPPER function ,
Here you can see the UPPER function is blocking the index for column “f_id” and the query doing FTS ( Full Table Scan ) . It is very painful for 30M table .
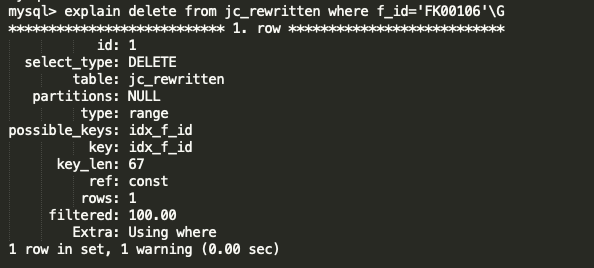
DELETE without UPPER function ,
Without UPPER function, the query is using the optimal index and does direct look up . It is very very fast .
Both the query will affect the same data ,
So, we have made the Query rewritten rule like below ,
just we are removing the UPPER function as it is not required .
After activated the query rule the SQL is running fine as expected . And, our performance issue was fixed .
You can see the warning message as how the server changed the query . Below is the logs from GENERAL query log ,
Conclusion :
Some of the database tools ( i.e. ProxySQL ) have more features on this Query rewritten topic . MySQL inbuilt query rewritten plugin recently ( from MySQL 8.0.12 ) supporting for DELETE’s , UPDATE’s , INSERT’s . And, it helps a lot to solve our production issue . Expecting more features on upcoming versions . Special Thanks to MySQL community Team !! I will be come up with my next blog as much as possible .
MySQL have the nice feature, which helps to write the error log with JSON format . This can be achieved through the MySQL components . In this blog, I am going to show the complete walkthrough involved in this process .
What is MySQL component ?
from MySQL document ,
MySQL Server includes a component-based infrastructure for extending server capabilities. A component provides services that are available to the server and other components. (With respect to service use, the server is a component, equal to other components.) Components interact with each other only through the services they provide.
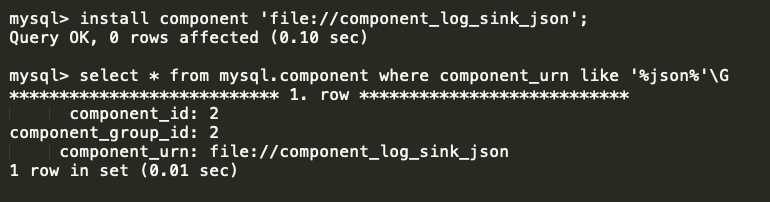
First step, we need to install the component “component_log_sink_json” .
cmd :
install component ‘file://component_log_sink_json’; select * from mysql.component where component_urn like ‘%json%’\G
There is a table “mysql.component” , which will helps to obtain the status of the MySQL components .
Step 2 : ( Enabling the JSON service ) :
There are few services, which helps to design the error log format. The services based on the filter or sink . The variable “log_error_services” will helps to enable the required services .
Available services :
log_filter_internal ( filter )
log_filter_dragnet ( filter )
log_sink_internal ( sink )
log_sink_json ( sink )
log_sink_syseventlog ( sink )
log_sink_test ( sink )
For our purpose , I am going to enable the services “log_filter_internal” and “log_sink_json”
log_filter_interval : Implements filtering based on log event priority and error code, in combination with the log_error_verbosity and log_error_suppression_list system variable
log_sink_json : Implements the JSON logging in error log
cmd :
set global log_error_services = ‘log_filter_internal; log_sink_json’;
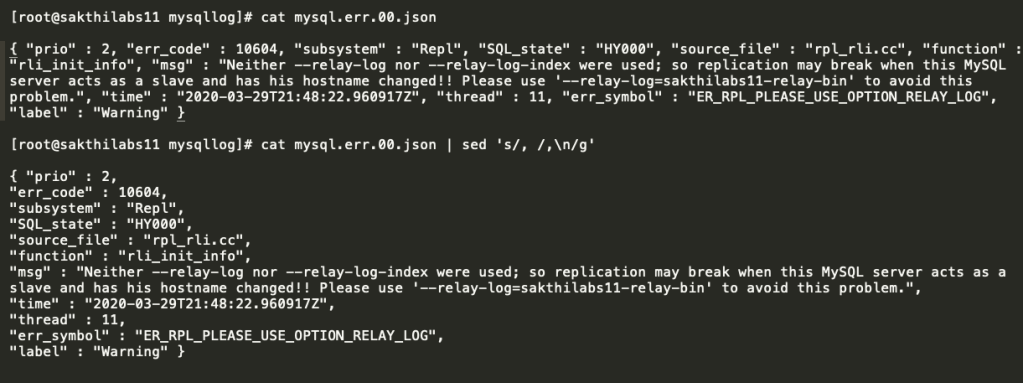
From the above screenshot, you can see the new file ( mysql.err.00.json ) was created , when I enabled the JSON service .
I have manually created a error log event for testing purpose ( by executing the wrong command ) ,
Yes, it is working well !!
Make sure to have the variable ( log_error_services) entry in the MySQL configuration file ( my.cnf ) as well . You can also use the SET PERSIST .
Note : The log directory should have the proper privileges .
How to uninstall the JSON component ?
You cannot simply uninstall the component by using the UNINSTALL COMPONENT command . You need to first remove the JSON service from the variable “log_error_services” . Then only the mysqld will allow you to perform the UNINSTALL COMPONENT command .
cmd :
uninstall component ‘file://component_log_sink_json’; set global log_error_services=’log_filter_internal; log_sink_internal’;
Conclusion :
MySQL ERROR log will not contain any additional information with JSON format . But, you will have the name of each columns ( Time : xxxxxx , err_code : xxxx ) . And, the view is better . Hope this blog will helps to someone who loves JSON . I will coup with my next blog as much as possible .
As a MySQL database administrator, we all using the MySQL client program for communicate to MySQL Server . Maximum the client program is used to execute the SQL’s, monitor the traffic and modify the variables . MySQL client program has some good features which can helps to make our work easier . In this blog I am going to explain some MySQL client program features which impressed me .
Execute the OS commands inside the MySQL client program
Create / Execute the SQL file inside the MySQL client program
Query output with XML and HTML languages
MySQL client program for learning MySQL commands .
Pager with MySQL client program
Safe UPDATE / DELETE with MySQL client program
Define the maximum number of rows in result set ( SELECT’s )
Execute the OS commands inside the MySQL client program :
Yes, It is possible to execute the OS commands inside the MySQL client program . There is no need to come out from your MySQL terminal for execute the OS commands .
syntax : system <command name>
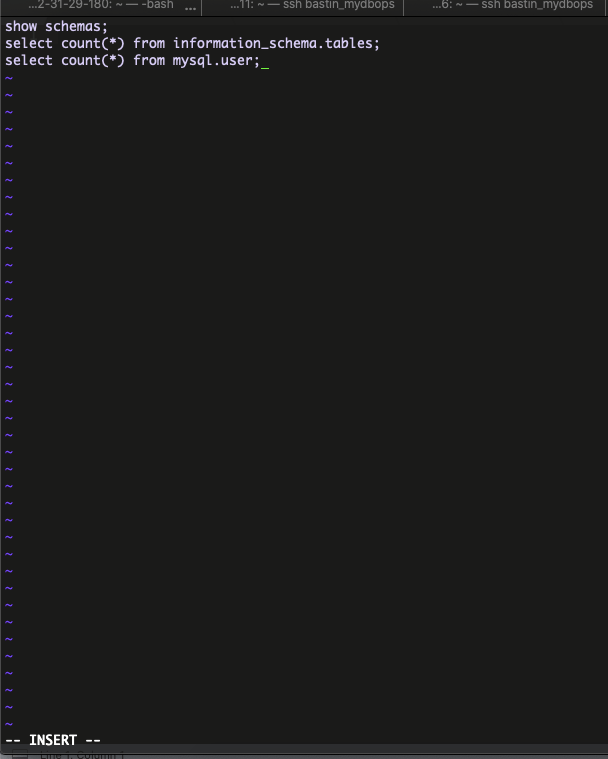
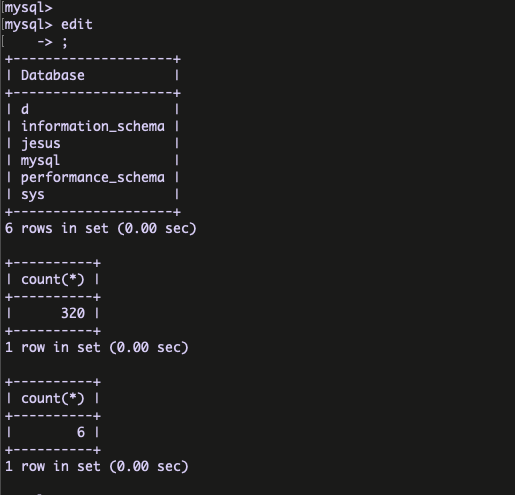
Create / Execute the SQL file inside the MySQL client program :
Yes, It is possible to create and execute the bunch of queries from SQL file . We can achieve this by using the command edit ( \e ).
syntax : edit
save the file using ” :wq!”
After save the file , put semi colon (;) and you can see the queries are executed .
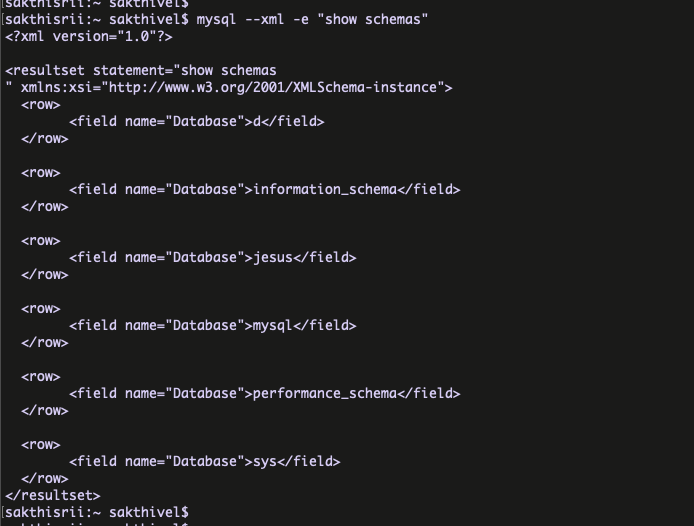
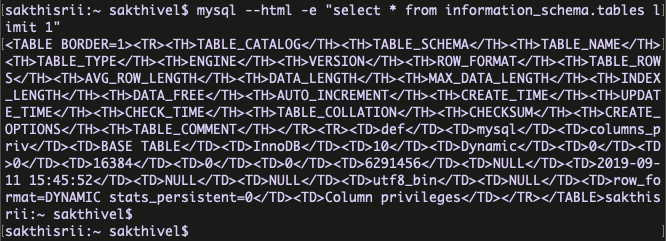
Query output with XML and HTML languages :
Yes, We have the option to display the result set with different languages like XML and HTML. The output files can be used for their own purposes like sending the email with HTML output etc …
for XML ,
syntax : mysql –xml
for HTML,
syntax : mysql –html
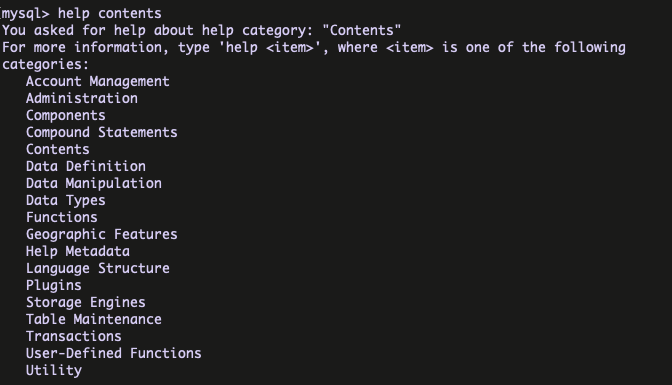
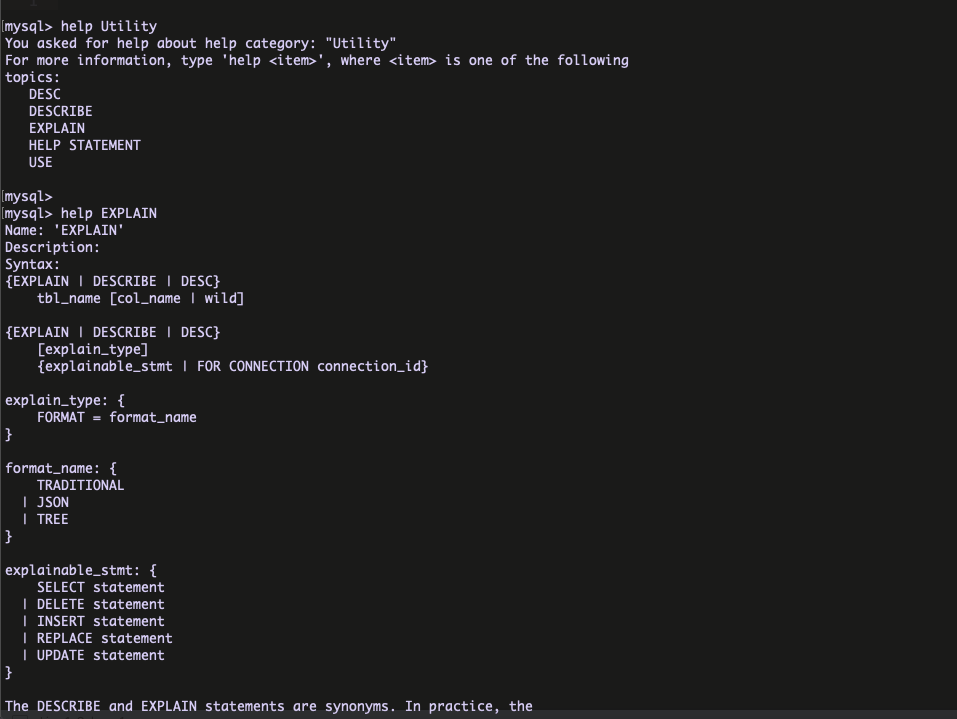
MySQL client program for learning MySQL commands :
MySQL client program provides the help command with the option contents for the learning purpose . This is very helpful for learning the MySQL commands ( like Manual ) .
syntax : help contents
Here I have Chosen the Utility and EXPLAIN part from Utility .
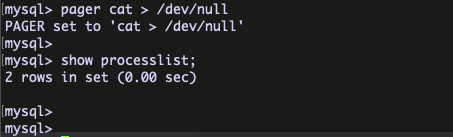
Pager with MySQL client program :
The most common usage of pager is to set it to a Unix pager such as MORE,LESS,CAT . The below blog have the nice examples about the MySQL pager command .
pager for only print the particular command Query ,
pager for discard the result sets ,
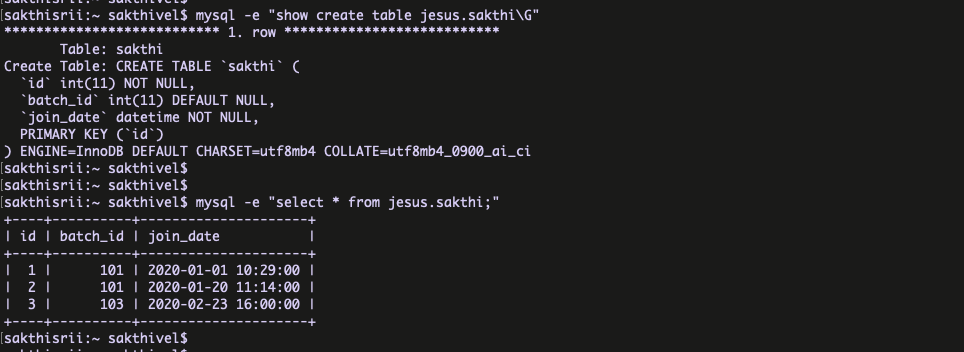
Safe UPDATE / DELETE with MySQL client program :
MySQL client program provides the option “–safe-updates” . If this option is enabled, UPDATE and DELETE statements that do not use a key in the WHERE clause or a LIMIT clause produce an error.
Here the column batch_id don’t have the INDEX . Now, I am going to enable the ” –safe-updates ” and perform the UPDATE/DELETE based on the column batch_id=103 ( which don’t have index ).
Not working because the “–safe-updates” flag prevents .
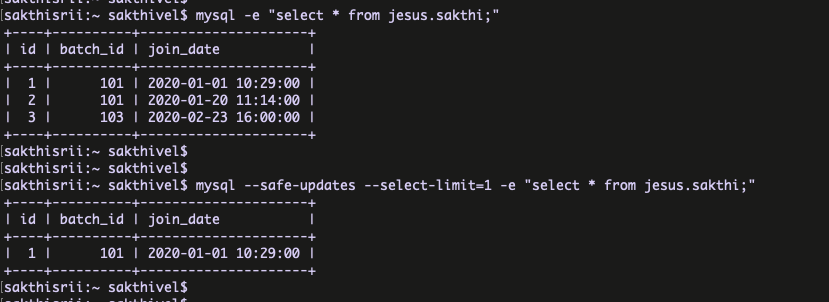
Define the maximum number of rows in result set ( SELECT’s ) :
We can define the automatic number of rows limit for SELECT statements when using –safe-updates.
example :
From the above example, it returns now row as per the configuration ( –select-limit=1 ) .
I hope every MySQL DBA has learned this things when they started their career with MySQL . Now, modern day we have the advanced client programs like “MySQL shell” . My personal intention of this post is to spread the good things of MySQL client program , because I personally love it lot . Hope this post helps someone, who is started to learn the MySQL .
Yes, by default your InnoDB transactions don’t have the Atomicity . But, you can control the atomicity of your InnoDB transaction with the variable innodb_rollback_on_timeout. We had a weird data inconsistency issue within the transaction . In this blog , I am going to explain “How it will happen?” and “How it can be fixed ?” .
Whats is Atomicity ?
From Wiki ,
Transactions are often composed of multiple statements. Atomicity guarantees that each transaction is treated as a single “unit”, which either succeeds completely, or fails completely: if any of the statements constituting a transaction fails to complete, the entire transaction fails and the database is left unchanged.
What is Innodb_rollback_on_timeout ?
From MySQL documentation,
InnoDB rolls back only the last statement on a transaction timeout by default. If –innodb-rollback-on-timeout is specified, a transaction timeout causes InnoDB to abort and roll back the entire transaction.
Here the transaction timeout will be happen based on the “innodb_lock_wait_timeout” setting .
All good, now we can experiment how it is working practically .
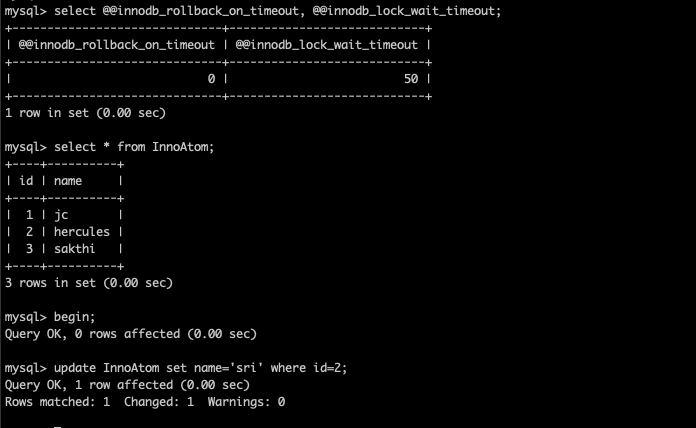
Experiment 1 ( Innodb_rollback_on_timeout = OFF )
I have created two MySQL client sessions ,
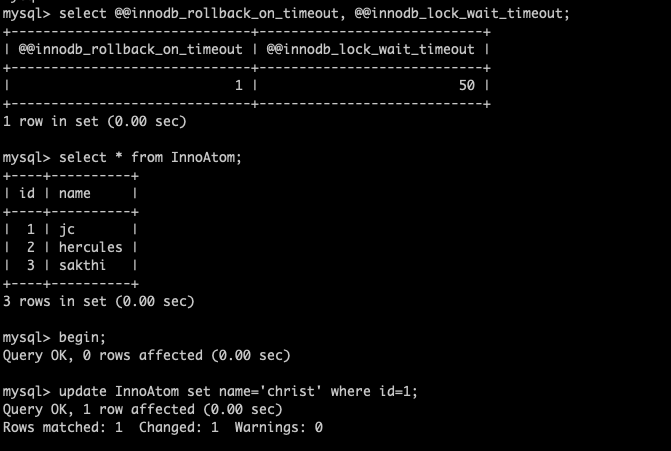
session 1 :
innodb_rollback_on_timeout=OFF
innodb_wait_timeout=50
Started a transaction
Ran the UPDATE to set name=’christ’ where id=1 ( not COMMIT )
now I am going to lock the second row ( id=2 ) at different session ( session 2 )
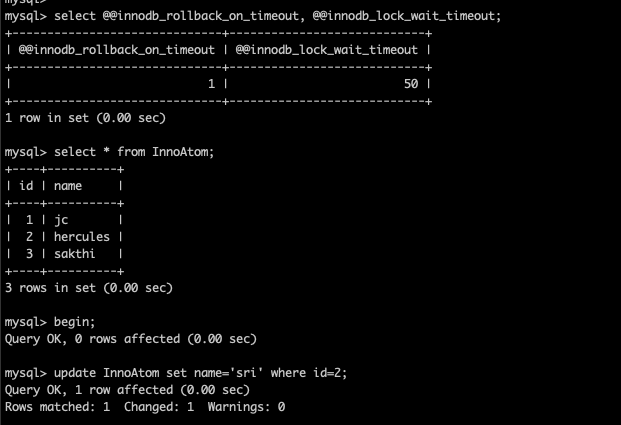
session 2 :
Started the transaction at session 2
Ran the UPDATE to set name=’sri’ where id=2 ( not COMMIT )
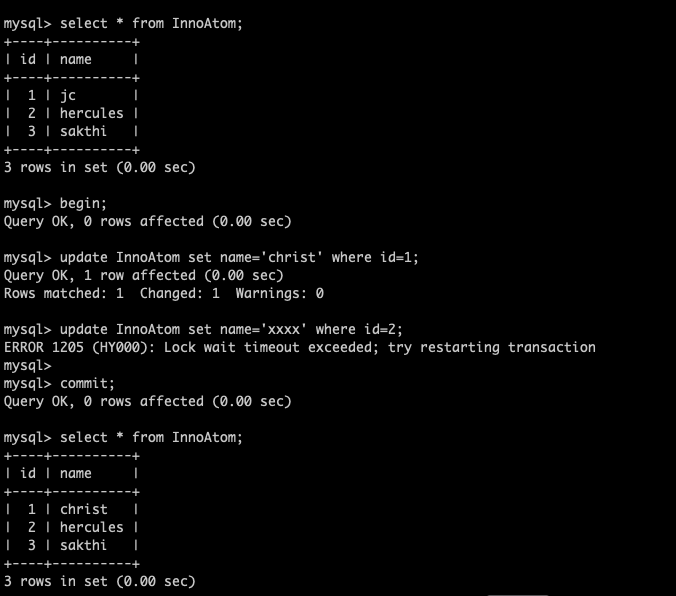
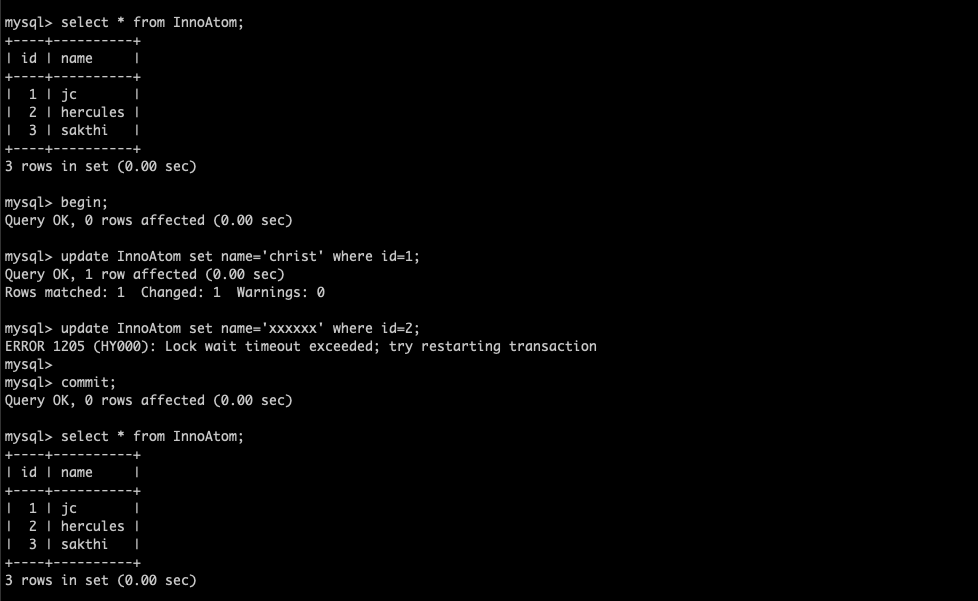
Now, I am going to update the same id = 2 at session 1 , so that it will exceed the innodb_lock_wait_timeout and the statement will fail .
session 1 :
Trying to access the row ( id=2 ) through the UPDATE
The UPDATE was failed with lock wait timeout because the session 2 is already hold that row .
Triggered the COMMIT
But after commit the transaction,
My first UPDATE was committed even the second statement was failed . You can see the output from the screenshot .
Sounds like ATOMICITY is missing ?
Lets do the second experiment …
Experiment 2 ( Innodb_rollback_on_timeout = ON ) :
I am going to repeat the same procedure with innodb_rollback_on_timeout=ON,
session 1 :
started the transaction and updated the row id=1
session 2 :
locking the row id=2
session 1 :
Creating the lock wait timeout inside the transaction and committing the transaction .
No changes happened . Make sense ?
With innodb_rollback_on_timeout = ON , Both the statements were not committed and the complete transaction has rolled back . THE ENTIRE TRANSACTION HAS ROLLBACK . So, this is the exact Atomicity right ?
Note : Changing the innodb_rollback_on_timeout requires the MySQL restart .
Hope this blog helps to understand the variable innodb_rollback_on_timeout . The blog proves, Having the innodb_rollback_on_timeout = ON provides the perfect/complete atomicity on your InnoDB system .
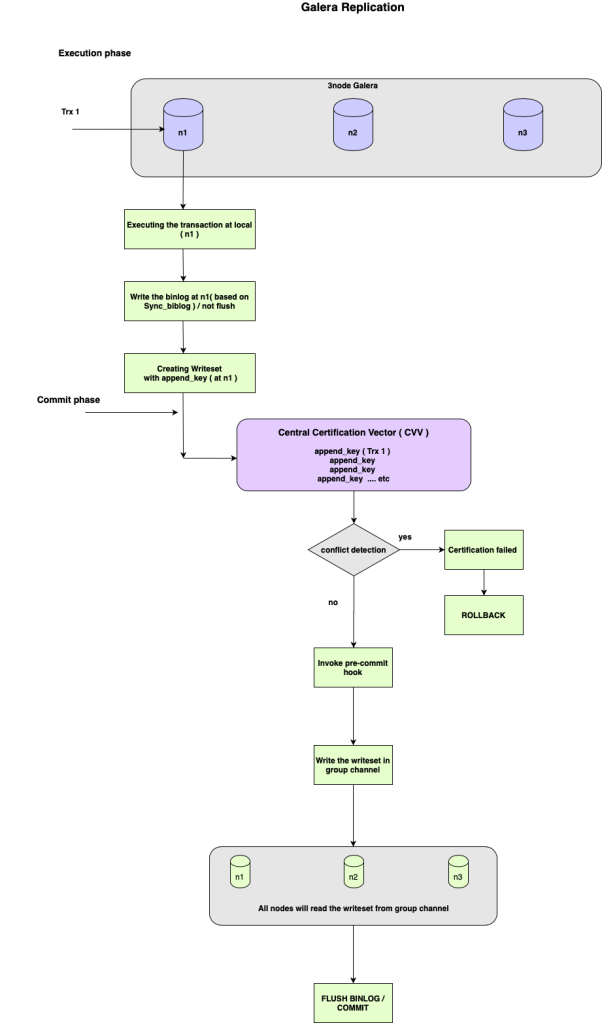
Galera is the best solution for High Availability, It is being used by many peoples world wide . Galera is doing synchronous replication ( really it is Certification based replication ) to keep update the data on group nodes . In this blog I have explained about “How the Galera replication works?” . For the better understanding, I have made an architecture diagram to describe the replication flow . I have also provided the explanation for the key words which has used in the architecture diagram .
Architecture flow Diagram :
What is writeset ?
Writeset contains all changes made to the database by the transaction and append_key of the changed rows .
What is append_key ?
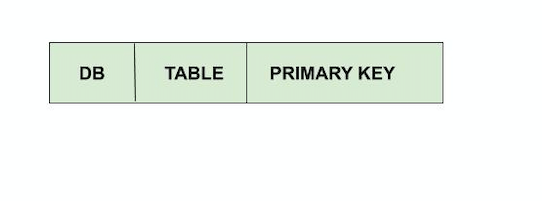
Append_key registers the key of the changed data by the transaction. The key for rows can be represented in three parts as DATABASE NAME, TABLE NAME, PRIMARY KEY .
If the table don’t have the PRIMARY KEY, the HASH of the modified data will be the part of the writeset .
What is Certification in Galera ?
Certification in Galera will be performed to detect the conflicts and the data consistency among the group . It will be performed before the transaction comiit .
What is CVV ( Central Certification Vector ) ?
CVV is used to detect the conflcits . The modified keys will added in to the Central Certification Vector. If the added key is already part of the vector, then conflict resolution checks are triggered.
Hope this blog will helps someone, who is working with Galera Cluster . I will be come up with my next blog soon .
We are well aware that ProxySQL is one of the powerful SQL aware proxy for MySQL. The ProxySQL configuration is flexible and the maximum part of configurations can be done with the ProxySQL client itself.
The latest ProxySQL release ( 2.0.9 ) has few impressive features like “SQL injection engine, Firewall whitelist, Config file generate” . In this blog I am going to explain, how to generate the ProxySQL config file using the proxySQL client .
Why configuration file ?
Backup solution
Helpful for Ansible deployments in multipul environments
There are two important commands involved in the ProxySQL config file generation.
Print the config file text in ProxySQL client itself ( like query output )
Export the configurations in separate file
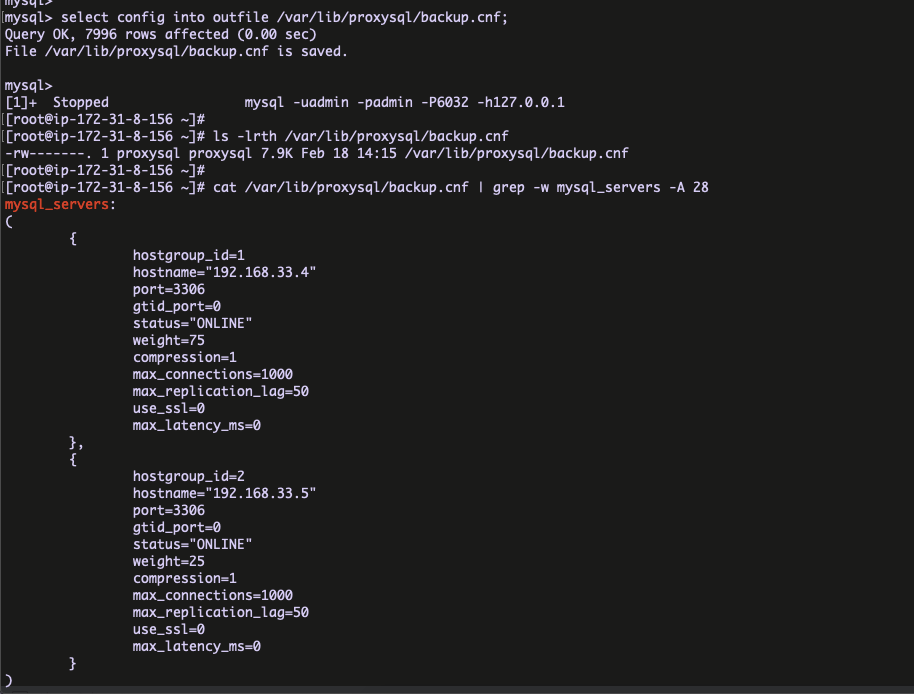
Print the config file text in ProxySQL client ( like query output ) :
cmd : SELECT CONFIG FILE ;
Export the configurations in separate file :
cmd : SELECT CONFIG INTO OUTFILE /path/config
Below is the bash script , which will helps to backup the ProxySQL configuration . It can be schedule in the cron with convenient time .
Are thinking the table fragmentation will be happened with only DELETE’s ?
Do you believe the INSERT’s will also cause the table fragmentation ?
Yes, INSERT’s with the ROLLBACK can also create the table fragmentation . In this blog I am going to explain how the INSERT is causing the table fragmentation .
How the table fragmentations is happening with INSERT and ROLLBACK ?
When you triggered the INSERT, it will start to write the data into it’s table space file ( .ibd ) . Right ?
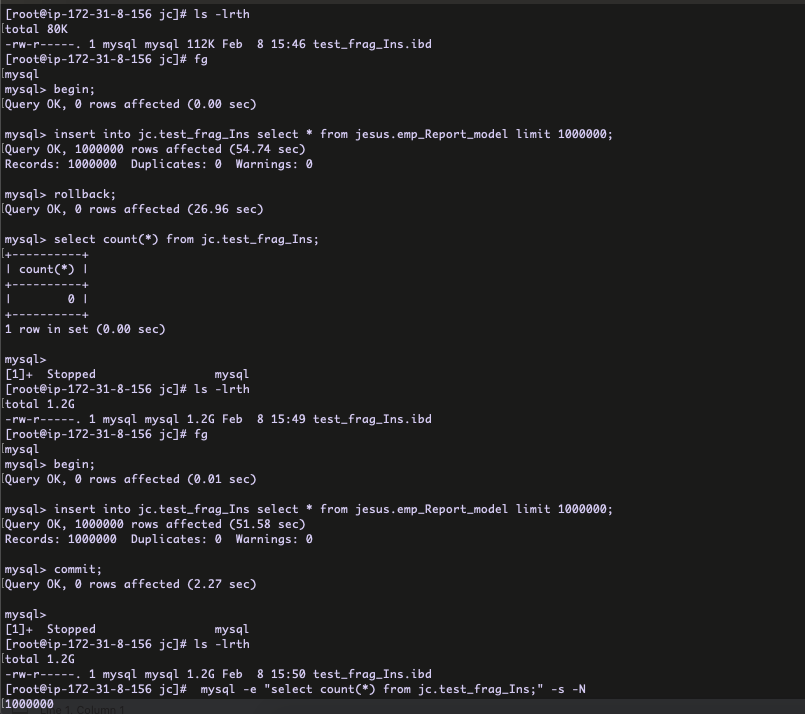
From the snap, I have created the table and started the transaction ( BEGIN ) with INSERT . Within the transaction the INSERT has been completed but still I did not commit / rollback the transaction .
You can check the table space file growth to 1.2 GB .
Now, I am going to rollback the transaction .
After the ROLLBACK completed, still the table space file size is 1.2 GB ( disk space is not reduced ). You can see the table don’t have any records at COUNT(*) section .
Make sense ?
Now, I wanted to check the table fragmentation . The usual query with INFORMATION_SCHEMA.TABLES will not give the exact fragmentation size . There is a nice article by Mr. Frederic Descamps to calculate the fragmented / wasted disk space . The query which used in the article will additionally use the IINFORMATION_SCHEMA.NNODB_TABLESPACES table .
Query :
SELECT NAME, TABLE_ROWS, format_bytes(data_length) DATA_SIZE, format_bytes(index_length) INDEX_SIZE, format_bytes(data_length+index_length) TOTAL_SIZE, format_bytes(data_free) DATA_FREE, format_bytes(FILE_SIZE) FILE_SIZE, format_bytes((FILE_SIZE/10 – (data_length/10 + index_length/10))*10) WASTED_SIZE FROM information_schema.TABLES as t JOIN information_schema.INNODB_TABLESPACES as it ON it.name = concat(table_schema,”/”,table_name) WHERE t.table_schema=’jc’ and t.table_name=’test_frag_Ins’;
So, now I need to rebuilt the table for recover the disk space ?
Yes, recovered the disk space . 🙂
Is the fragmented disk space is re-usable ?
Yes, it is re-usable , the below example will explain it .
From the above snap, first I have created the fragmented space ( 1.2 GB ) with INSERT/ROLLBACK . Then again I ran the same INSERT but this time committed the transaction . Still the disk space is same 1.2 GB .
Make sense ? 🙂
Hope this blog gives some additional information and it helps to understand the table fragmentation in MySQL !!